Are there specific rubber band colors that work best for beginners? Learning how to make bracelets with rubber bands is a fun and rewarding craft activity that appeals to kids, teens, and adults alike. This colorful hobby combines creativity with fine motor skills, making it both entertaining and educational. Whether you’re using a loom or your fingers, the process is simple to learn but offers endless design possibilities. From rainbow patterns to intricate weaves, each bracelet becomes a unique wearable piece of art. As a result, many schools, camps, and families have adopted this craft as a go-to pastime. Moreover, mastering how to make bracelets with rubber bands encourages patience, focus, and personal expression.
In recent years, the popularity of rubber band bracelets has grown significantly. What began as a playground trend has evolved into a global phenomenon supported by kits, online tutorials, and social media communities. People now create themed sets, gift bracelets to friends, and even sell their designs online. The materials are affordable and widely available. Additionally, the use of bright colors and customizable patterns makes every project exciting. Therefore, whether you’re a beginner or an experienced crafter, exploring how to make bracelets with rubber bands opens up a world of creative potential.
 Introduction to Rubber Band Bracelets
Rubber band bracelets are a fun and creative accessory that people of all ages enjoy. They are made by weaving colorful rubber bands into various patterns and designs. These bracelets are lightweight, stretchy, and can be personalized for any occasion. They are a great way to express your creativity and make unique gifts for friends and family. Let’s dive into the world of rubber band bracelets and learn the basics.
What Are Rubber Band Bracelets?
Rubber band bracelets are small, elastic accessories crafted by looping and interlocking rubber bands together. They come in various styles, patterns, and color combinations. Crafters use simple techniques or more advanced weaves to create unique designs. These bracelets gained popularity due to their simplicity and versatility. They can be worn casually or for special events, adding a personal touch to your outfit.
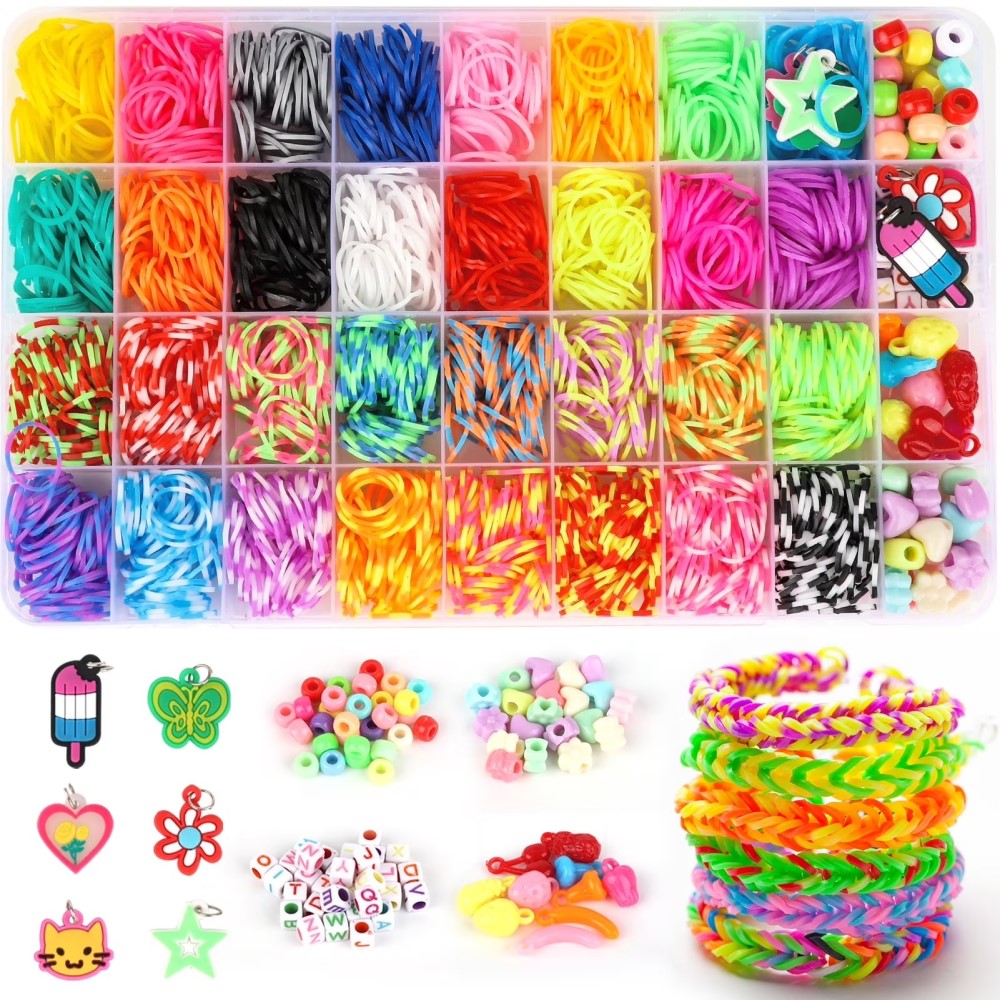
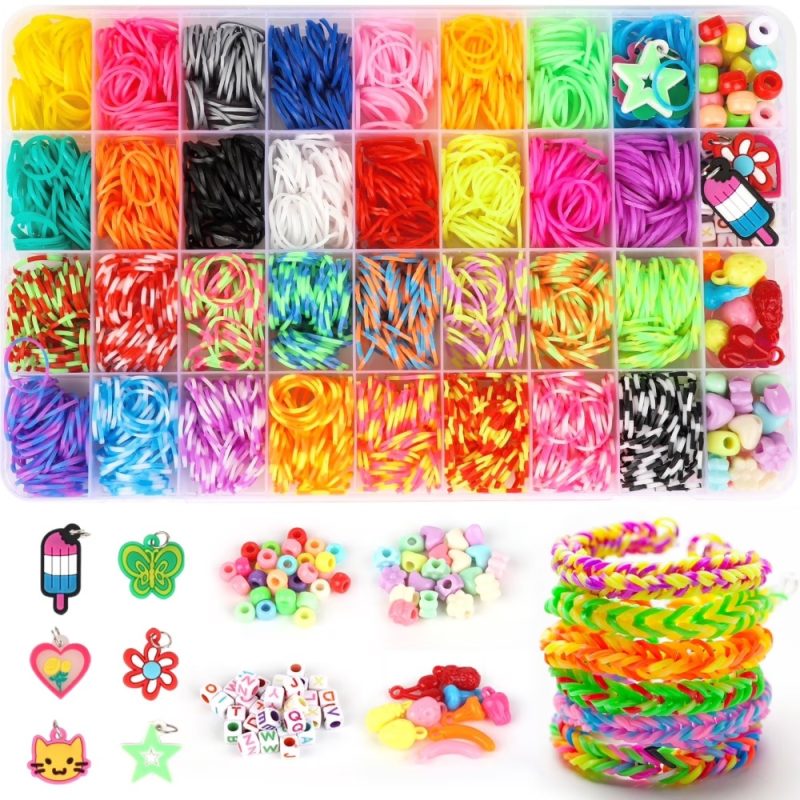
Materials Needed to Make Rubber Band Bracelets
To make rubber band bracelets, you will need a few essential materials:
- Rubber Bands: Choose colorful and stretchable rubber bands. They come in different sizes and colors.
- Loom: A loom helps you weave the bands more easily. You can use a store-bought loom or a DIY alternative.
- Hook Tool: This tool helps guide and interlock the bands while weaving.
- C-Clips or S-Clips: These are used to secure the bracelet ends together.
- Extras (optional): Add beads, charms, or other small decorations for customization.
Once you gather these materials, you are ready to start making your own creative rubber band bracelets!
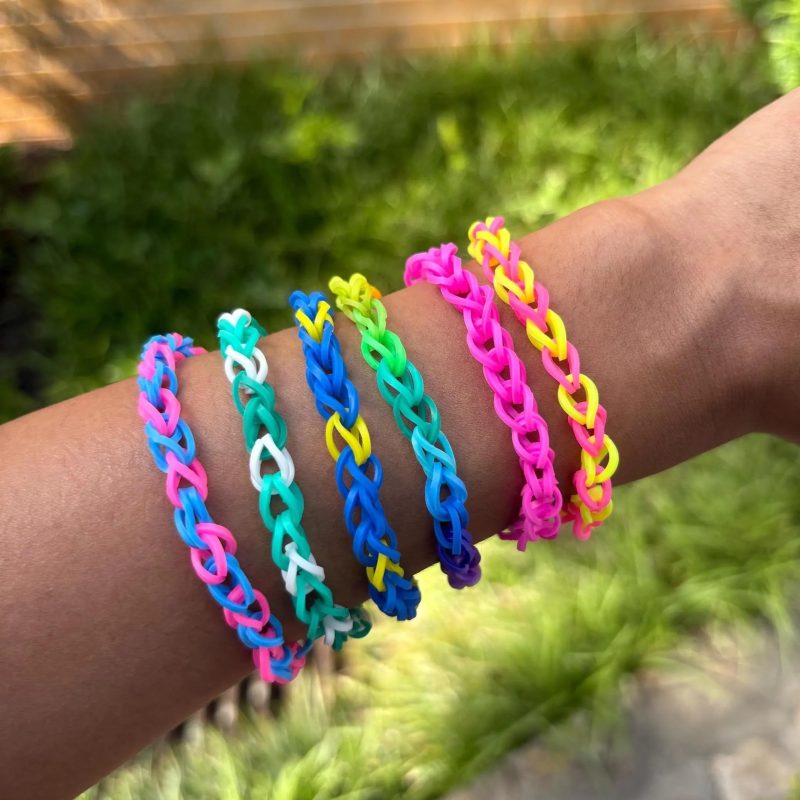
Types of Rubber Band Bracelets
Rubber band bracelets come in various styles and patterns. Each design has its unique charm. From simple styles to intricate patterns, you can choose a type based on your skill level or preference. Below are some popular types of rubber band bracelets you can try.
Single Loop Bracelet
The single loop bracelet is the simplest type. It is ideal for beginners learning how to make bracelets with rubber bands. You only need to loop one band through another repeatedly. This style creates a minimalist and clean design. Use different colors to make it more vibrant and fun.
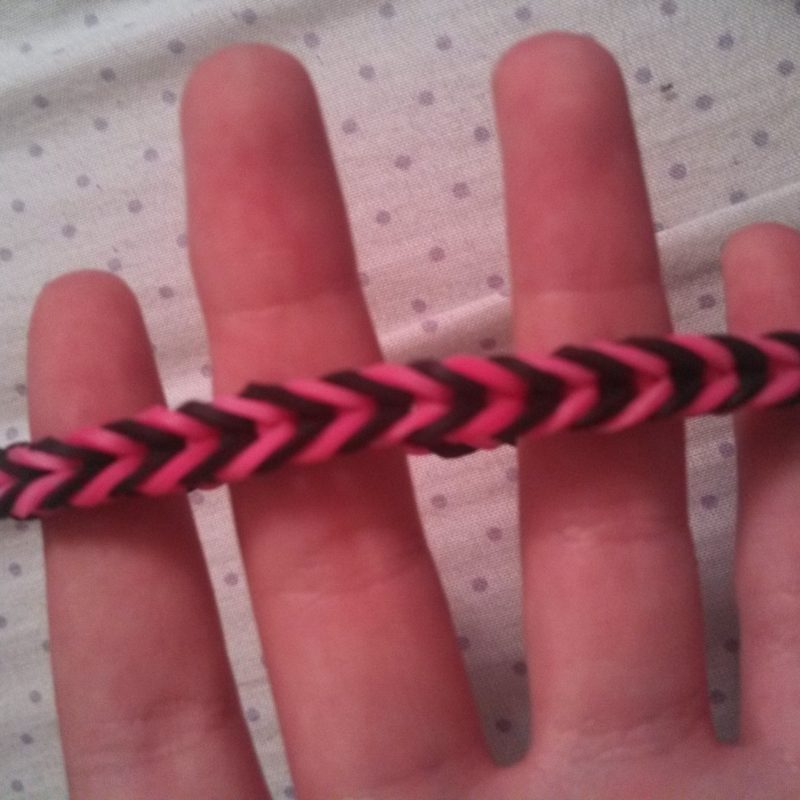
Fishtail Bracelet
The fishtail bracelet is a popular choice for its braided look. It requires weaving two sets of bands, alternating them like a fishtail braid. This design takes a little more time but gives a sleek and elegant result. Try combining bright shades for a playful and stylish bracelet.
Double Twist Bracelet
The double twist bracelet offers a thicker, layered design. It involves twisting and interlocking two rubber bands at a time. This pattern looks more intricate and adds a bold statement to your look. Mix contrasting colors for a striking effect or soft hues for a subtle style.
Custom Designs and Variations
For more creativity, explore custom designs and variations. Add your personal touch by incorporating beads, charms, or unique patterns. Try themes for special occasions, like holiday colors or friendship bracelets. Experiment with using multiple layers or combining techniques to create a one-of-a-kind piece.
 Tools and Equipment for Bracelet Making
Creating rubber band bracelets requires simple yet essential tools and equipment. These tools make the crafting process easier and allow for diverse bracelet designs. Selecting the right materials is key to making beautiful and durable bracelets.
Rubber Bands and Their Varieties
Rubber bands are the main material for creating these bracelets. Choose colorful, elastic bands that are durable. Rubber bands come in various sizes, shapes, and colors. Opt for small-sized bands for intricate designs and larger bands for bold styles. Some bands even have glitter or patterns for added flair. Mixing and matching provides endless customization possibilities.
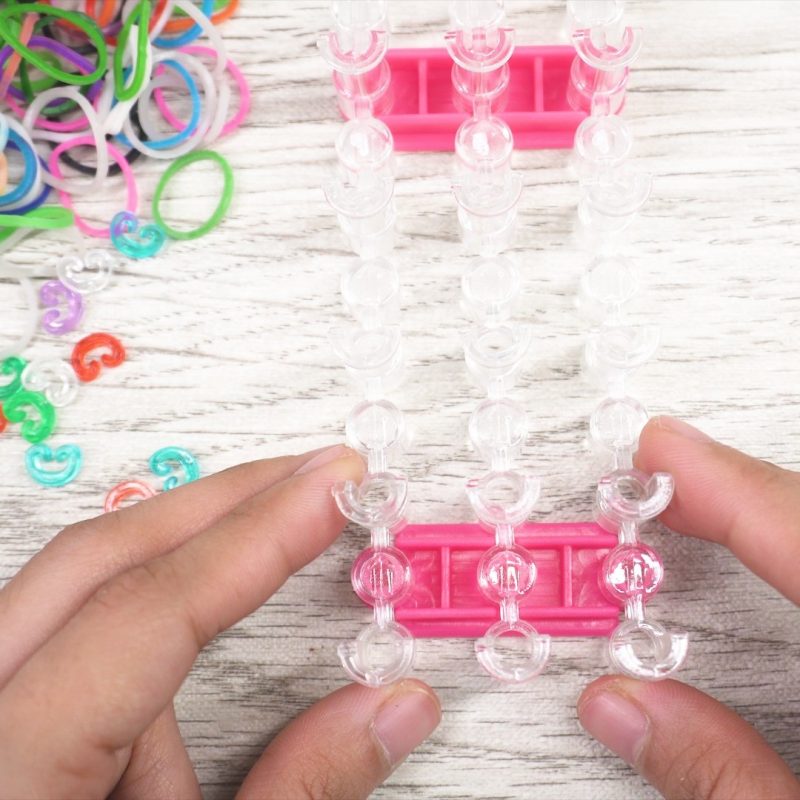
Loom Options (Traditional and DIY Looms)
A loom simplifies weaving rubber bands into designs. Traditional looms, found in craft stores, come in fixed shapes for standard patterns. Advanced looms offer customization for creative designs. DIY looms are budget-friendly alternatives made from household items like pencils or forks. Choose a loom type that suits your skill level and intended design complexity.
Hook Tools for Weaving
Hook tools are essential for guiding and interlocking rubber bands during weaving. These tools help create tight, secure loops and avoid tangling. Small, plastic hook tools work well for lighter bands. Metal hooks are ideal for durable bracelets or designs with intricate details. A sturdy hook ensures smooth weaving and reduces the chance of errors.
Step-by-Step Process to Make Rubber Band Bracelets
Creating rubber band bracelets is a fun and engaging activity. Following a step-by-step process makes it easier to achieve stunning results. Whether you’re a beginner or experienced, these steps will guide you clearly.
Preparing Your Workspace
- Find a Clean Area: Choose a tidy and flat surface to work on.
- Organize Your Materials: Set rubber bands, loom, hook tools, and clips within easy reach.
- Ensure Good Lighting: Bright lighting helps to see the bands clearly while weaving.
- Comfortable Seating: Sit at a comfortable height to avoid strain and fatigue.
A well-prepared workspace boosts creativity and focus. Organizing tools saves time during crafting, ensuring a hassle-free process.
Setting Up the Loom
- Place Your Loom: Position the loom on your workspace securely.
- Understand the Loom Structure: Learn how its pegs and rows work for bracelet designs.
- Choose a Starting Point: Pick the peg to begin laying rubber bands.
- Arrange Bands: Place the initial rubber bands in your desired colors and pattern.
Setting up is an essential step for smooth weaving. Get familiar with your loom before creating designs.
Weaving Rubber Bands: Basic Movements
- Start Looping Bands: Use your hook tool to loop the first band onto the next peg.
- Repeat Movements: Continue interlocking bands following the loom pattern.
- Maintain Tension: Keep the bands tight but not overstretched.
- Check Progress: Pause occasionally to ensure the design stays consistent.
Learning these movements is the foundation for making creative rubber band bracelets with ease.
Adding New Bands and Finishing Touches
- Add New Bands as Needed: Continuously add more bands to extend the bracelet’s length.
- Secure the Ends: Use C-clips or S-clips to fasten the ends of the bracelet.
- Inspect the Design: Review the bracelet for gaps or loose bands.
- Personalize It: Add beads, charms, or decorative elements for a unique touch.
Finishing the bracelet properly ensures durability and style. Adding extras enhances its appeal and makes it one-of-a-kind.
 Tips and Tricks for Success
Creating stunning rubber band bracelets requires attention to key details. These tips will help you master the craft and achieve professional-looking results with ease.
Choosing the Right Color Combinations
- Match Colors Joyfully: Pair lively shades like neon or pastel for bright, fun bracelets.
- Thematic Designs: Align colors with occasions like red and green for Christmas themes.
- Enhance Contrast: Use contrasting colors like blue and yellow to make patterns stand out.
- Personal Style: Choose colors that reflect your mood, taste, or personality.
- Experimentation Is Key: Try unexpected combos for unique and artistic bracelets.
Selecting the right hues enhances the bracelet’s overall charm. Color choices convey style and creativity.
Maintaining Tension and Alignment
- Consistent Pressure: Apply uniform tension while hooking bands for a tight and neat design.
- Avoid Overstretching: Do not pull bands too hard; it may snap or distort the pattern.
- Align Bands Properly: Ensure bands are arranged evenly along the loom for symmetry.
- Pause and Check: Regularly inspect loops for alignment and tension before continuing.
- Use Quality Tools: Sharp and sturdy hooks improve weaving precision.
Proper tension and alignment help create durable and visually pleasing bracelets.
Avoiding Common Mistakes
- Skipping Pegs: Do not skip loom pegs; it ruins the design’s flow.
- Using Low-Quality Bands: Low-grade elastic bands break easily, compromising the final product.
- Ignoring Loom Setup: Understand the loom’s layout to avoid misplaced bands.
- Rushing the Process: Bracelets made hastily often lack detail and craftsmanship.
- Neglecting Ends: Always secure ends firmly to prevent the bracelet from falling apart.
Learning from mistakes ensures a smoother crafting experience and avoids frustration.
By following these tips, even beginners can create eye-catching rubber band bracelets with ease and confidence.
Fun and Creative Ideas for Rubber Band Bracelets
Rubber band bracelets offer limitless opportunities for creativity and personalization. Explore new ways to enhance your designs with unique ideas that make your bracelets stand out. Here are some fun and creative ideas to try with your rubber band bracelets.
Adding Beads or Charms
- Choose Decorative Elements: Pick beads, charms, or pendants to add to your design.
- Thread Beads Between Bands: While weaving, slide beads onto the bands for added detail.
- Alternating Patterns: Use a bead or charm every few loops for an attractive pattern.
- Theme Inspiration: Match charms based on themes like animals, stars, or initials.
- Secure Placement: Ensure beads or charms stay in place while creating the bracelet.
Adding beads or charms adds dimension and a personal touch to your bracelets.
Patterns and Themes for Special Occasions
- Holiday Themes: Create bracelets with holiday colors, such as red, green, and white for Christmas.
- Seasonal Colors: Choose warm tones for fall or bright shades for spring.
- Celebratory Designs: Craft bracelets with themes for birthdays, weddings, or graduations.
- Festive Accessories: Add small embellishments like snowflakes, hearts, or stars.
- School Spirit: Use school or team colors to show your pride.
Thematic patterns make your bracelets perfect for marking special moments and events.
Creating Multicolored and Layered Designs
- Mix Color Palettes: Use contrasting or complementary colors for eye-catching designs.
- Layer Multiple Bands: Stack several bands together for a bold, thick bracelet.
- Gradient Effect: Blend colors by gradually transitioning from one hue to another.
- Rainbow Designs: Arrange bands to create a full rainbow pattern.
- Experiment With Techniques: Combine weaving styles to build intricate, layered effects.
Multicolored and layered designs allow for endless customization and unique looks.
By exploring these creative ideas, your rubber band bracelets will become more than just accessories. They will be vibrant expressions of your style and imagination.
 How to Care for Your Rubber Band Bracelets
Rubber band bracelets can lose their quality over time without proper care. Regular cleaning and maintenance, along with safe storage, can help preserve their lifespan and color. Follow these simple steps to keep your bracelets in great shape.
Cleaning and Maintenance
- Wash Gently: Use cold or lukewarm water to clean your bracelets.
- Mild Soap Solution: Mix a few drops of mild soap with water.
- Soft Cleaning Tool: Gently scrub the bracelet using a soft brush or cloth.
- Rinse Thoroughly: Rinse the bracelet under clean water to remove soap residue.
- Air Dry Completely: Let the bracelet air dry completely before wearing or storing it.
- Avoid Harsh Chemicals: Do not use bleach or abrasive cleaners as they may damage the bands.
- Check Elasticity: Regularly inspect for stretched or broken bands and replace them if necessary.
Proper cleaning prevents dirt build-up and keeps rubber bands vibrant and elastic.
Storing Your Bracelets Safely
- Choose a Dry Spot: Store bracelets away from moisture to avoid mold and stickiness.
- Keep Out of Sunlight: Direct sunlight can fade colors and weaken the rubber bands.
- Use a Storage Box: Store bracelets in a box or pouch to prevent tangling.
- Separate Using Dividers: Keep bracelets organized using small compartments or dividers.
- Avoid Stacking Too Many: Overcrowding can stretch and deform the rubber bands.
- Keep Away from Sharp Objects: Avoid items that can puncture or tear the bands.
- Label Favorites: Organize by type, color, or design for easy access.
By following these tips, your rubber band bracelets will remain stylish and durable. Proper care and storage ensure they stay as vibrant as the first day they were made.
Frequently Asked Questions About Making Rubber Band Bracelets
Common Concerns and Helpful Answers
Can I wash a rubber band bracelet? No, water weakens the bands. Avoid wearing them while swimming or bathing. Remove before washing hands.
Do the bands lose their stretch? Yes, over time. Store bracelets away from heat and sunlight to prolong life.
Can I make wide bracelets? Yes. Use larger looms or double up patterns side by side. These require more bands but look bold.
What if my bracelet keeps breaking? Check for weak links or improper clipping. Ensure the S-clip connects both ends firmly.
Are there eco-friendly options? Some brands offer biodegradable or recycled-content bands. Look for sustainable packaging too.
Can I sell the bracelets I make? Yes, once you’ve mastered how to make bracelets with rubber bands. Many crafters sell online or at local markets.
With care and practice, your creations will improve steadily.
 Final Thoughts
How can I create rubber band bracelets without special tools? Exploring how to make bracelets with rubber bands offers more than just colorful accessories. It builds creativity, focus, and confidence in crafters of all ages. From simple loops to detailed weaves, each project brings a sense of accomplishment. The low cost and accessibility make it easy to start and expand. Whether using a loom or fingers, the process remains engaging and satisfying.
Furthermore, this craft fosters connection. Families bond over shared projects. Friends exchange handmade gifts. Teachers use it to support learning goals. The how to make bracelets with rubber bands journey is not just about the end product—it’s about the joy found in creating something with your own hands. So grab your bands, pick a pattern, and begin weaving today.