
Learning how to make bracelets with string is a simple, rewarding activity that brings joy to kids, teens, and adults alike. This craft requires only a few basic supplies, yet it opens the door to endless creativity. Whether you’re making friendship bracelets, decorative accessories, or personalized gifts, string art allows you to express your style in a hands-on way. Because of this, how to make bracelets with string has become a popular pastime around the world.
Moreover, these bracelets are more than just fashion items—they carry emotional value. Many people exchange them as symbols of connection, love, or support. Schoolyards, summer camps, and craft circles thrive on bracelet-making traditions. As a result, mastering how to make bracelets with string means joining a global community of makers.
With so many styles and techniques available, there’s something for every skill level. This guide covers tools, knots, designs, tips, and safety. Whether you’re new to crafting or looking to expand your skills, this information helps you get started confidently.
 Materials Needed for String Bracelets
Making string bracelets is simple with the right materials. Here are the essentials:
- String or Thread: Choose durable string, such as embroidery floss, crochet thread, or nylon cord. Select vibrant colors to match your design.
- Scissors: Use sharp scissors for clean cuts and better accuracy.
- Tape or Clipboard: Secure your bracelet while knotting. Tape is great for surfaces, while a clipboard holds it firmly.
- Measuring Tape or Ruler: Measure string lengths precisely for consistent bracelet sizes.
- Optional Decorations: Bring beads, charms, or sequins to enhance your bracelet’s look.
- Glue (Optional): Secure knot ends with glue to avoid fraying.
Gather these materials before starting. Having everything ready ensures a smooth crafting process.
Choosing the Right Type of String
Selecting the right string is crucial for making durable and attractive bracelets. Here’s what to consider:
Embroidery Floss
This is the most popular choice for string bracelets. It comes in many colors and is easy to knot. Its smooth texture makes it ideal for intricate designs.
Crochet Thread
Crochet thread is thicker than embroidery floss and gives a stronger bracelet. It’s great for simpler patterns and rugged designs.
Nylon Cord
Nylon cord is durable and resistant to fraying. It’s perfect for bracelets that will be worn often.
Choosing the Right Thickness
The thickness of your string depends on your design. Thin strings are better for detailed designs, while thicker strings work well for bold styles.
Stretchy Bands
Stretchy bands are less common but are perfect for adjustable bracelets. They work great for casual wear.
Consider Color
Pick vibrant colors that match your personality. Combining multiple hues gives your bracelet a stylish look.
Quality Matters
Always choose high-quality strings. Cheap strings can fray or snap easily, ruining your creation.
With these tips, you can find the perfect string for your bracelet. It sets the foundation for a great design!
 Basic Knotting Techniques
Learning basic knotting techniques is the first step to making string bracelets. Each knot creates patterns and enhances the design. Here are the key techniques:
Overhand Knot
The overhand knot is simple and great for beginners. Loop the string and pull through the loop tightly. Use it to start and finish bracelets.
Square Knot
The square knot is strong and used in most bracelet designs. It involves looping two strands over and under each other repeatedly.
Half-Hitch Knot
This knot creates neat rows and is perfect for detailed patterns. Wrap the string around and pull it tight against the previous loop.
Spiral Knot
Spiral knots form a twisting pattern. Repeat half-hitch knots in the same direction to create a spiral effect.
Lark’s Head Knot
This is ideal for adding beads or charms. Fold the string in half, slide the loop through, and pull the ends tight.
Practice Makes Perfect
Practice each knot repetitively to master the techniques. Begin with simpler knots and progress to advanced designs.
Mastering these knots lays the foundation for crafting stylish string bracelets. Use consistent tension for neat and durable designs.
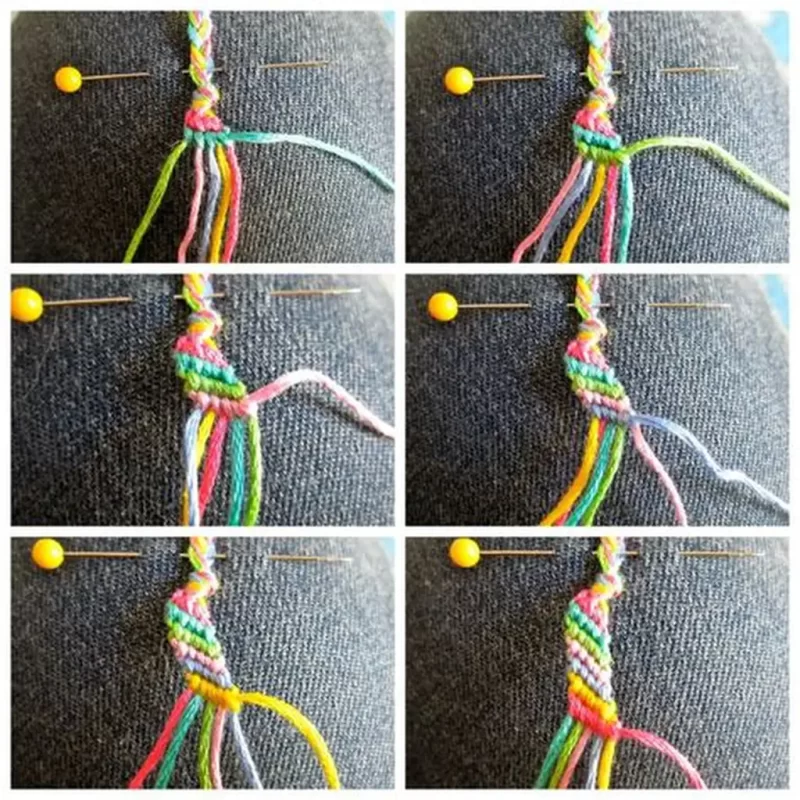
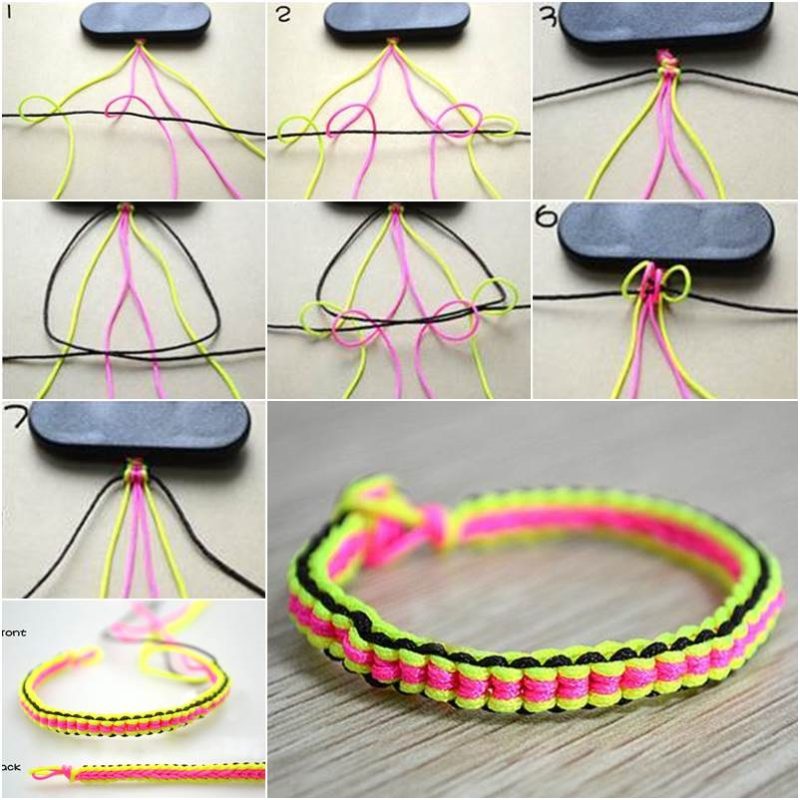
Step-by-Step Instructions for Making a Simple String Bracelet
How to make bracelets with string? Making a string bracelet is fun and easy when you follow these simple steps:
- Choose Your Strings: Select 3–5 strings in different colors. Cut each string to 24 inches.
- Secure the Strings: Tie the ends together with an overhand knot. Use tape or a clipboard to secure the knot.
- Separate the Strands: Spread the strings out so they don’t tangle, keeping them in order.
- Start Knotting: Use the square knot or other basic knots to create your design. For example:
- Take the leftmost string and cross it over the next string.
- Pull it under and tighten to form the first knot.
- Repeat the process with the next string in the sequence.
- Continue Knotting: Work row by row to form a pattern. Keep even tension for neat knots.
- Finish the Bracelet: When it’s long enough, tie all the strings into a tight overhand knot.
- Trim the Excess: Use scissors to cut off any extra string, leaving a small tail.
- Secure the Ends (Optional): Use glue to prevent fraying. Let it dry before wearing.
Follow these steps to craft a simple yet stylish bracelet. Experiment with colors to make it your own!
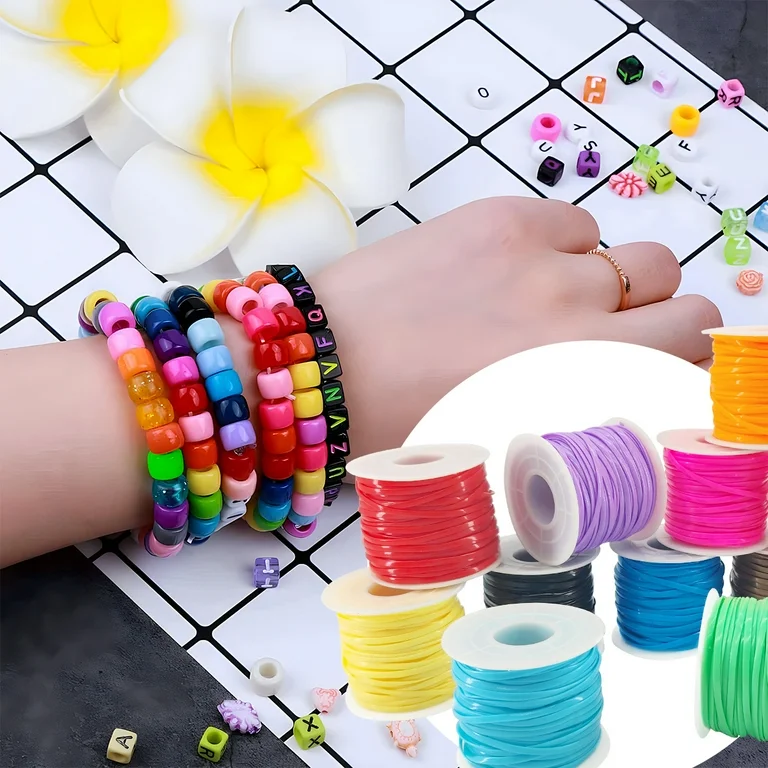
Adding Beads and Other Decorations
Enhance your string bracelets by adding beads and decorations. These additions make your design unique. Here’s how to incorporate them effectively:
Choosing the Right Beads
- Material Matters: Select beads made from wood, plastic, glass, or metal for different looks.
- Size and Shape: Choose beads that complement your bracelet’s overall thickness and pattern.
- Color Coordination: Pick bead colors that match or contrast your string colors beautifully.
Preparing Your Bracelet
- Knot your strings securely before adding beads.
- Plan your pattern to decide bead placement.
- Use tape or a clipboard to stabilize the bracelet during decoration.
Adding Beads During Knotting
- Slide a bead onto the string before making a knot.
- Secure the bead in place with the next knot.
- Repeat the process to create a consistent pattern.
Using Charms and Pendants
- Attach small charms directly onto the string with lark’s head knots.
- Ensure the charm lies flat and doesn’t shift.
Tips for Secure Decorations
- Double Knots: Use double knots around beads to keep them in place.
- Glue: Add a drop of glue to secure knots near beads.
- Spacing: Keep even spacing for a polished appearance.
Adding beads and decorations turns a basic bracelet into a personalized accessory. Experiment to craft a design that stands out!
 Popular String Bracelet Patterns to Try
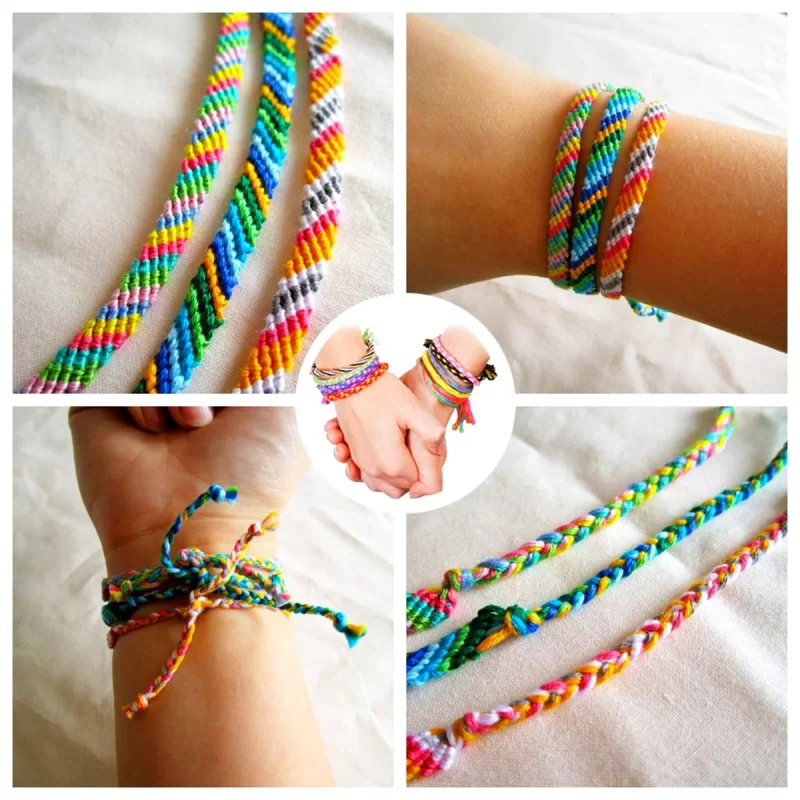
String bracelets come in various patterns, each offering a unique and stunning design. Here are some popular patterns to inspire your creativity:
Chevron Pattern
- The chevron pattern features a V-shaped design that looks symmetrical and sleek.
- Use alternating colors to create a vibrant, eye-catching bracelet.
- Mastering square knots will ensure your chevron design looks clean.
Diagonal Stripe Pattern
- This pattern creates bold, slanted stripes in different colors.
- Knot each string diagonally across others to achieve the look.
- It’s simple yet perfect for beginners trying multi-strand designs.
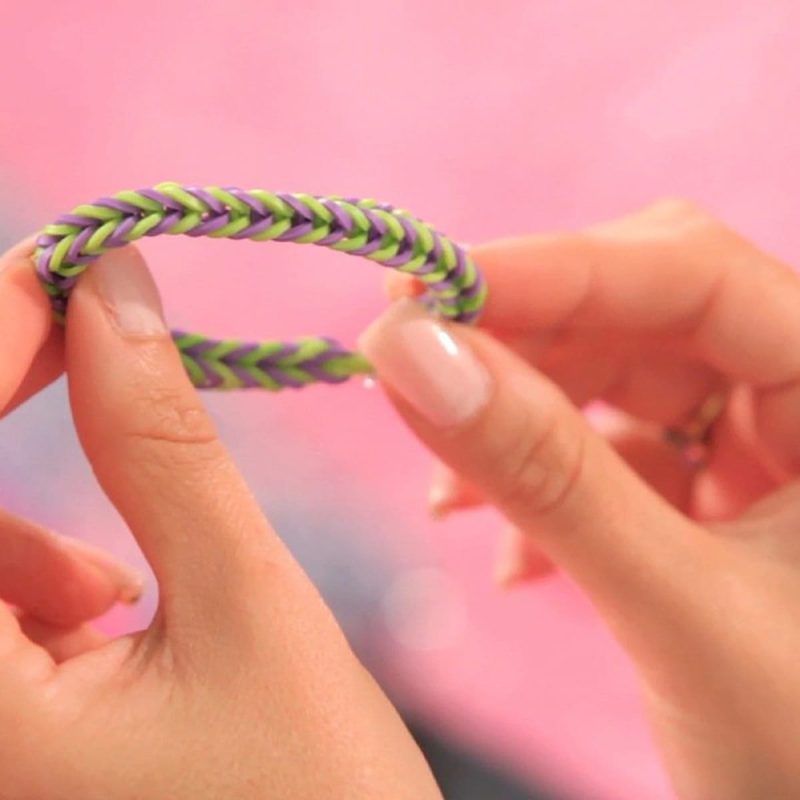
Fishtail Pattern
- The fishtail design resembles a braided pattern.
- Use two strings per color to create thick, alternating rows.
- This pattern is elegant and works well with neutral tones.
Braided Pattern
- The braided style is simple and timeless.
- Divide your strings into three strands and braid them together.
- Add small beads for extra detail to this classic style.
Heart Pattern
- The heart pattern is ideal for showing love and affection.
- Alternate strings strategically to form cute heart shapes.
- Practice patience, as this design requires careful knotting.
Diamond Pattern
- This pattern forms diamond shapes throughout the bracelet.
- Use strings of contrasting colors for clear, defined diamonds.
- It’s a bit advanced but offers a chic result.
Zigzag Pattern
- The zigzag design offers a playful and fun appearance.
- Use a series of spiral knots to create the zigzag effect.
- Combine bright colors for a cheerful bracelet.
Wave Pattern
- The wave pattern mimics the natural flow of ocean waves.
- Alternate knotting directions to create this unique look.
- Perfect for summer vibes and beachwear.
Ladder Pattern
- The ladder design features parallel strings connected by knots in the center.
- Use one color for the steps and another for the frame.
- This structured design is simple yet striking.
Infinity Pattern
- The infinity knot symbolizes eternity and love.
- Form a continuous loop with repeating layers.
- Great for friendship or couple bracelets.
Explore these patterns, experiment with colors, and add your twist to make them unique. Practice regularly to refine your skills!
Tips for Creating Unique Designs
Creating unique string bracelet designs is all about experimenting and personalizing. Follow these tips:
Mix Colors Creatively
- Combine bold and subtle colors for contrast and appeal.
- Use gradients or rainbow hues for artistic flair.
- Match your bracelet colors to outfits or themes.
Experiment with Knots
- Mix different knot techniques in one bracelet.
- Combine square knots with spiral knots for texture.
- Use lark’s head knots to attach charms or beads.
Add Beads and Charms
- Include beads with metallic finishes for an elegant look.
- Use themed charms to represent hobbies, interests, or meaningful symbols.
- Match decorative pieces to specific occasions, like summer or holidays.
Change String Thickness
- Combine thin and thick strings in one design.
- Thicker threads add depth; thinner threads create intricate detail.
- Use stretchy cords for adjustable bracelets.
Combine Patterns
- Merge chevron, wave, and zigzag patterns in large bracelets.
- Alternate stripe designs between different sections.
- Experiment with alternating shapes like hearts and diamonds.
Personalize for Meaning
- Use favorite colors or lucky charms for personal significance.
- Create letters, initials, or symbols with knots for customization.
- Make bracelets as gifts, adding the recipient’s favorite elements.
Use Unique Materials
- Incorporate metallic or holographic threads for a modern look.
- Add natural ornaments, like wood beads or shells.
- Combine materials like leather cords with strings for a bold style.
Keep Innovating
- Try layering bracelets for stacked styles.
- Explore online tutorials for fresh ideas and patterns.
- Look at nature and art for inspiration.
With these tips, your bracelets can showcase creativity and personality. Don’t be afraid to try new things!
 How to Care for and Preserve Your String Bracelets
String bracelets are delicate and require proper care to maintain their beauty. Follow these simple tips:
Clean Regularly
- Wipe your bracelet gently with a damp cloth to remove dirt.
- Avoid harsh soaps that can weaken the string or fade its color.
- For beads, use a soft brush to clean intricate patterns.
Store Properly
- Keep your bracelets in a cool and dry place to avoid damage.
- Use zippered pouches or small boxes to prevent tangling.
- Store them separately from heavier accessories to avoid fraying.
Avoid Water Damage
- Remove your bracelet before swimming or showering.
- Too much moisture can weaken knots and cause mildew.
- If it gets wet, dry it immediately.
Handle Gently
- Avoid pulling or stretching the bracelet excessively.
- Handle carefully to retain its shape and design.
Repair When Necessary
- Fix fraying knots by retying them securely.
- Glue or reseal ends to prevent further damage.
Protect from Chemicals
- Keep your bracelet away from perfumes, detergents, or cleaning products.
- Chemicals can dull beads and harm threads.
Rotate Usage
- Avoid wearing the same bracelet daily to reduce wear and tear.
- Rotate your collection to preserve each piece longer.
Inspect Regularly
- Check for loose knots or worn threads periodically.
- Address issues early to prevent further damage.
Proper care helps your string bracelets stay stylish and last longer. Preserve them to enjoy their charm for years.
Frequently Asked Questions
Can I wash string bracelets?
Yes, but gently. Hand wash with mild soap. Air dry flat. Avoid machine washing.
What age is best for learning?
Kids as young as 6 can start. Supervise younger children with scissors.
How long does it take to make one?
Simple ones take 15–30 minutes. Complex designs may need several hours.
Can I sell bracelets I make?
Yes. Many crafters sell on Etsy or at markets. Credit designers if using their patterns.
Are string bracelets durable?
They last months with care. Avoid water, lotions, and rough surfaces.
Can I use regular thread?
Yes, but embroidery floss is stronger and brighter.
Do I need special tools?
No. Scissors, tape, and string are enough to start.
How do I adjust size?
Measure the wrist first. Add one inch for comfort. Test-fit during making.
Can I make them waterproof?
Not fully. Coating with clear nail polish helps resist moisture.
Is it okay to use old string?
Only if not frayed or faded. Old thread may snap during use.
 Final Thoughts on Mastering How to Make Bracelets with String
Learning how to make bracelets with string is more than a hobby—it’s a gateway to creativity, mindfulness, and connection. With minimal supplies and a little practice, anyone can create beautiful, meaningful pieces. From simple braids to intricate patterns, the possibilities grow with each knot tied.
This craft bridges generations. Parents teach children. Friends trade designs. Teachers use it in classrooms. It fosters patience, focus, and pride in handmade work.
As you improve, your confidence grows. What once seemed difficult becomes natural. Soon, you’ll design your own patterns. You might even teach others.
So pick up some string and start today. Whether for fun, relaxation, or gift-giving, how to make bracelets with string enriches your life. Let your imagination lead the way.