
Creating your own bracelets is not only a fun and rewarding hobby but also a way to express your personal style and creativity. Whether you’re a beginner or looking to refine your crafting skills, understanding how to make bracelets opens up endless possibilities for unique and customized jewelry pieces. In this guide, we will explore various techniques, cost effective ways to make bead bracelets at home, and tips to help you master the art of bracelet making, ensuring that each piece you create is beautiful and personalized.
 Materials Needed to Make Bracelets
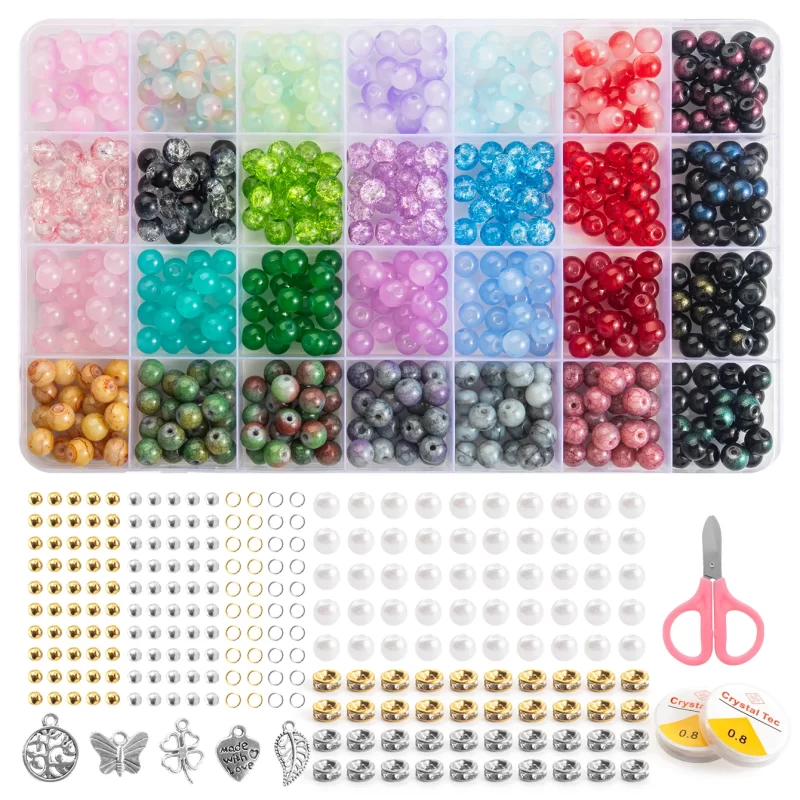
Creating bracelets requires the right materials for the style you choose. Each type needs specific supplies.
Common Materials
- Beads: Glass, plastic, wooden, or gemstone beads are popular choices.
- Cords: Elastic, nylon, cotton, or leather cords suit different bracelet designs.
- Wire: Jewelry wire works for wire-wrapped or charm bracelets.
- Charms: Select decorative charms for personalized designs.
- Clasp and Findings: Lobster clasps, jump rings, and crimps secure the bracelet.
Optional Items
- Glue: Use glue for added strength in certain designs.
- Spacer Beads: Add these to enhance bracelet patterns.
- Embroidery Floss: Essential for making friendship bracelets.
Getting high-quality materials is key to crafting beautiful bracelets. Choose colors and textures you love.
Choosing the Right Type of Bracelet to Make
Choosing the right bracelet type is essential for a satisfying crafting experience. Each bracelet style offers unique characteristics to suit different preferences and occasions. Below are popular bracelet types to consider:
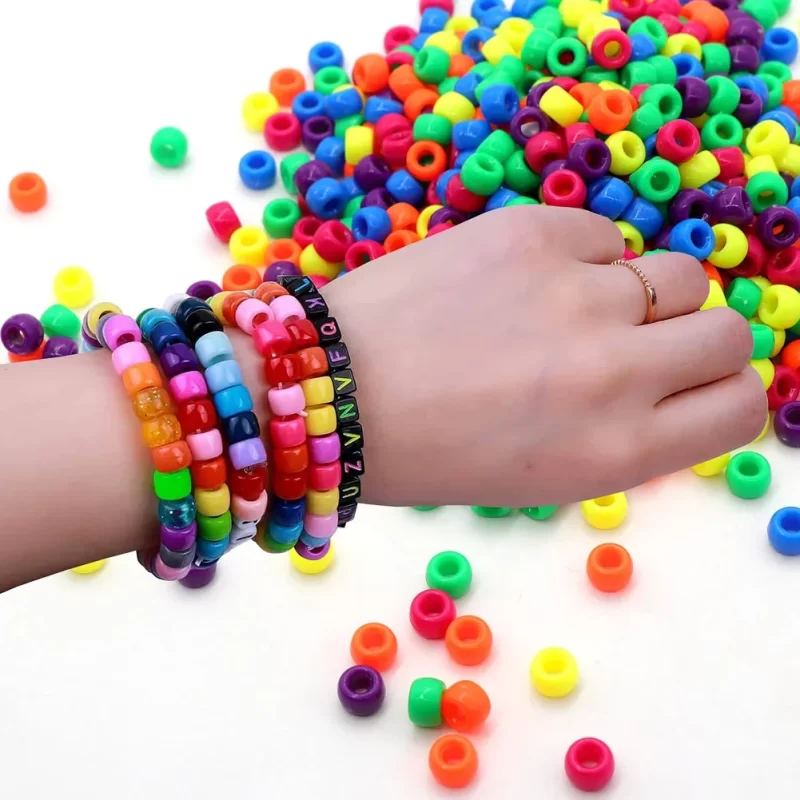
Beaded Bracelets
Beaded bracelets are versatile and easy to make. You can use various bead materials, such as glass, wood, or gemstones. These bracelets are great for mixing colors and patterns to match outfits or moods.
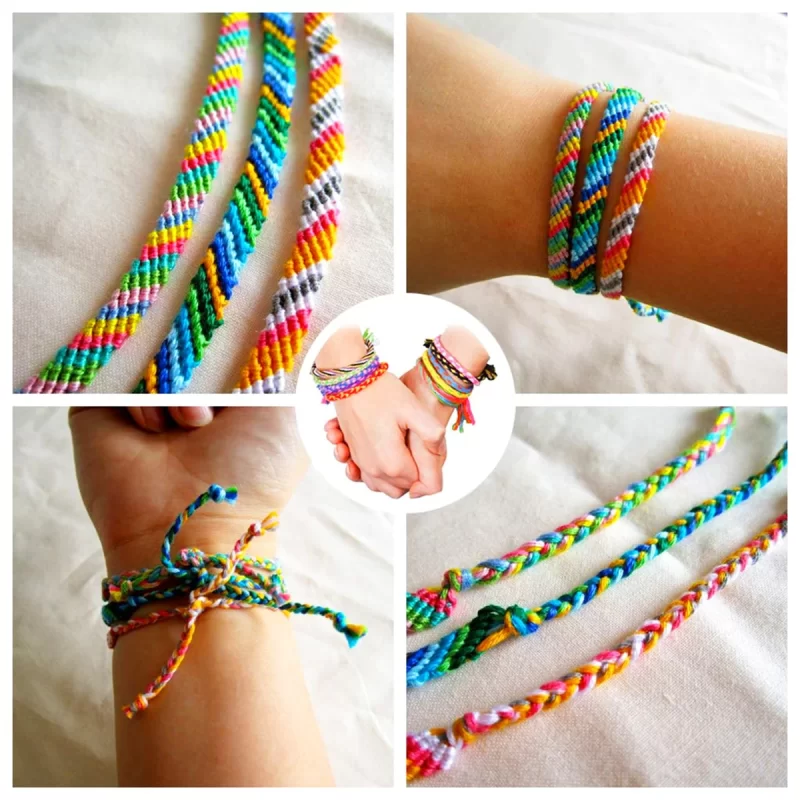
Friendship Bracelets
Friendship bracelets are colorful and meaningful. They are often made with embroidery floss using simple knots. These are perfect for gifting to friends or creating personalized designs with their favorite colors.
Wire-Wrapped Bracelets
Wire-wrapped bracelets use jewelry wire to create intricate designs. This style allows the addition of beads or charms, resulting in a professional, elegant look. These bracelets require a steady hand and the right tools for precision.
Charm Bracelets
Charm bracelets let you express individuality with decorative charms. Add symbols, initials, or small objects that represent memories or achievements. They are fun to make and offer endless customization.
Understanding these styles helps you decide what to try first. Select a style that matches your skills, materials, and personal preferences for a fun crafting session.
Tools Required for Bracelet Making
Having the right tools is vital for making professional-looking bracelets. Different styles need different tools, but there are some universal essentials:
Essential Tools for All Bracelets
- Scissors: Precise cutting is important, especially for cords and threads.
- Pliers: Needle-nose and round-nose pliers help with shaping and securing jewelry wire.
- Wire Cutters: Use these to snip jewelry wire cleanly without fraying.
- Tape or Clips: These hold cords steady while you work on intricate designs.
- Measuring Tape: Ensure an accurate fit by measuring wrist sizes and material lengths.
Specific Tools for Advanced Bracelet Styles
- Beading Needles: These make threading small beads quick and easy.
- Crimping Tool: Secure clasps and finishings on beaded and wire-wrapped bracelets.
- Embroidery Needle: Use this for threading embroidery floss in friendship bracelets.
- Macrame Board: Essential for knotting patterns in macrame bracelets.
- Jewelry Hammer and Anvil: Perfect for flattening or shaping metal components.
Optional Tools to Enhance Your Crafting
- Bead Organizer: Keep beads sorted and prevent accidental spills.
- Mandrel or Bracelet Sizer: Maintain consistent shapes and sizes while designing.
- Glue Applicator: For secure and seamless attachments in complex designs.
Carefully selecting tools simplifies your bracelet-making process. They ensure neat, polished, and durable results every time.
Step-by-Step Instructions for Various Bracelet Styles
Beaded Bracelets
- Gather Supplies: Get beads, elastic cord, scissors, and optional crimp beads.
- Measure and Cut: Use a measuring tape to cut the cord slightly longer than your wrist size.
- Arrange Beads: Lay out a pattern with your chosen beads on a flat surface.
- String Beads: Thread the beads onto the cord carefully, keeping the pattern intact.
- Tie a Knot: Use a double or triple knot to secure the ends. For extra security, add glue.
- Trim Excess: Snip any extra cord near the knot for a clean finish.
Friendship Bracelets
- Choose Colors: Pick embroidery floss in complementary or favorite colors of the recipient.
- Cut Floss: Cut strands of floss approximately 24–30 inches each, depending on wrist size.
- Secure Base: Tie a knot at one end and attach it to a clip or tape for stability.
- Start Knotting: Use basic macrame knots like forward or backward knots to form patterns.
- Continue the Design: Repeat the knots, following the pattern until the bracelet reaches desired length.
- Finish: Tie a knot at the end and trim the excess floss.
Wire Wrapped Bracelets
- Prepare Materials: Use jewelry wire, beads, wire cutters, and pliers.
- Cut Wire: Cut a length of wire based on your wrist size, plus extra for wrapping.
- Secure One End: Use round-nose pliers to create a small loop on one end.
- Add Beads: Slide beads onto the wire, leaving space for wrapping.
- Create Designs: Wrap the wire around beads or form shapes to enhance the look.
- Finish Off: Secure the other end by creating another loop or attachment point.
Make Charm Bracelets
- Choose a Chain: Select a bracelet chain suitable for attaching charms.
- Pick Charms: Gather small charms representing personal memories or themes.
- Attach Jump Rings: Use pliers to add jump rings to each charm.
- Add Charms to Chain: Space charms evenly and secure them to the chain.
- Check for Security: Tug each charm lightly to ensure it’s firmly attached.
- Close the Bracelet: Add a clasp or fastening to secure the chain around your wrist.
 Tips and Tricks for Crafting Beautiful Bracelets
Creating stunning bracelets involves attention to detail and thoughtful techniques. Here are some useful tips:
Organize Before Starting
- Plan Your Design: Sketch your idea or lay materials to visualize colors and patterns.
- Sort Materials: Arrange beads, charms, and cords systematically for an efficient crafting process.
- Prepare Tools: Keep all tools within reach to minimize interruptions.
Focus on Quality
- Use Good Materials: Select high-quality beads, cords, and findings for durability.
- Inspect Components: Check beads for cracks and cords for fraying before use.
- Secure Fastenings: Ensure clasps and knots are tight to prevent bracelets from falling apart.
Improve Crafting Techniques
- Maintain Tension: Keep threads tight while knotting or stringing beads for uniform designs.
- Work Slowly: Take your time for polished and professional results.
- Experiment with Patterns: Mix textures, colors, and bead sizes to create unique designs.
Avoid Common Pitfalls
- Don’t Rush: Rushing can cause mistakes and uneven designs.
- Double-Check Measurements: Ensure correct wrist sizing to prevent a too-loose or tight fit.
- Check Stability: Ensure charms and beads are securely placed before wearing.
Enhance Your Creativity
- Mix and Match: Combine bracelet types for unique styles, like beaded-charm hybrids.
- Personalize Designs: Add initials or themed charms to customize.
- Practice Regularly: Frequent crafting boosts skill and confidence.
By following these tips, you’ll craft stunning and durable bracelets that showcase your creativity.
Common Mistakes to Avoid When Making Bracelets
Crafting bracelets is enjoyable, but avoiding mistakes ensures better results. Beware of these common errors:
Choosing Poor-Quality Materials
- Cheap Beads: Low-quality beads break or fade quickly.
- Weak Cords: Cords that fray make bracelets fragile.
- Unreliable Clasps: Poor fastenings can cause bracelets to fall off.
Skipping Proper Measurements
- Ignoring Wrist Size: Incorrect sizing leads to bracelets that are too tight or loose.
- Cutting Short Materials: Always measure and cut with extra length for safety.
Neglecting Design Planning
- Random Patterns: Rushing into designs creates uneven or mismatched patterns.
- Too Many Colors: Overloading colors can make the bracelet look chaotic.
Rushing Through the Process
- Loose Knots: Quick knotting often results in insecure closures.
- Poor Bead Stringing: Beads rushed onto the cord might fall off later.
Forgetting to Secure Components
- Weak Fastenings: Always double-check that clasps and knots are secure.
- Loose Charms: Tug lightly to ensure charms are tightly attached.
Using Incorrect Tools
- Dull Scissors: Dull tools lead to frayed cords and uneven cuts.
- Wrong Pliers: Using improper pliers can damage wire and jump rings.
Overlooking Finishing Details
- Skipping Trims: Leaving excess cord or wire creates an untidy look.
- Ignoring Glue: Failing to add glue can weaken knots or attachments.
Not Checking for Durability
- Weak Bracelets: Test the bracelet’s strength before wearing it.
- Unstable Designs: Ensure all components are securely fitted.
Focus on each step to avoid these mistakes. Careful crafting leads to beautiful and durable bracelets.
 How to Personalize Your Bracelets
Personalizing your bracelets adds a unique touch that reflects your personality and style. Customization also makes your creations meaningful, especially when gifting. Here are some ways to make your bracelets truly one of a kind:
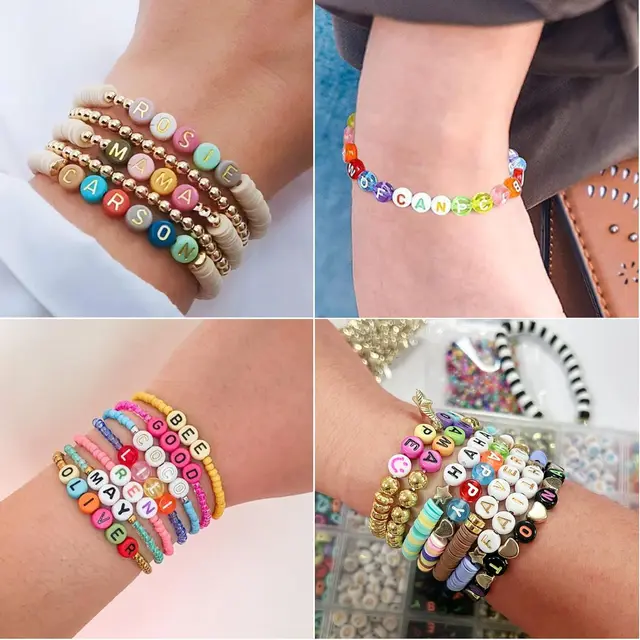
Add Initials or Names
- Letter Beads: Use beads with letters to spell names or initials.
- Engraved Charms: Choose engraved charms with words, names, or meaningful dates.
- Handwriting Elements: Incorporate pendants with handwritten messages stamped or printed on them.
Use Birthstone Colors
- Gemstone Choices: Select beads or stones that match birth months.
- Color Themes: Integrate birthstone hues into the overall color scheme.
- Family Bracelets: Combine multiple birthstones to represent loved ones.
Incorporate Meaningful Charms
- Symbolic Charms: Add symbols like hearts, stars, or favorite animals.
- Hobby-Themed Charms: Include elements that reflect hobbies, like music notes or sports objects.
- Travel Mementos: Use small charms from places you’ve visited.
Play with Colors and Patterns
- Favorite Colors: Choose beads in your favorite shades.
- Custom Patterns: Create unique arrangements with alternating beads or color tones.
- Gradient Effects: Blend hues for a sleek gradient-style bracelet.
Use Unique Materials
- Natural Elements: Incorporate wood, shells, or stones for a boho look.
- Recycled Items: Create eco-friendly bracelets with upcycled materials like buttons or fabric.
- Metal Accents: Use gold or silver pieces for added elegance.
Add Personal Messages
- Text Tags: Attach metal tags engraved with inspiring quotes or words.
- Hidden Notes: Create woven designs that conceal a small note or word.
- Beaded Codes: Spell messages using Morse code beads.
Create Themed Designs
- Seasonal Themes: Use colors and charms that reflect specific seasons or holidays.
- Event-Specific: Design bracelets for weddings, anniversaries, or themed parties.
- Zodiac Symbols: Add charms or patterns related to astrology signs.
Personalized bracelets are both creative and meaningful. Experiment with different materials and techniques to craft something unique. The possibilities are endless, making each piece special and unforgettable.
Where to Find Inspiration for Bracelet Designs
Finding inspiration for bracelet designs opens the door to endless creativity. Here are some ways to spark ideas:
Nature and Outdoors
- Flowers and Leaves: Use colors and shapes inspired by plants and flowers.
- Seasonal Themes: Incorporate elements that reflect the current season, like summer waves or fall leaves.
- Natural Materials: Collect shells, stones, or wood pieces for unique bracelet designs.
Fashion Trends
- Observe Jewelry Trends: Check magazines or online fashion pages for popular bracelet styles.
- Runway Shows: Take cues from designer collections displayed on fashion shows.
- Celebrity Styles: Look at bracelets worn by influencers and celebrities for ideas.
Culture and Traditions
- Ethnic Patterns: Explore designs inspired by traditional patterns and motifs.
- Regional Beads: Use beads or materials unique to a specific culture.
- Symbolic Charms: Include charms that represent cultural symbols or stories.
Everyday Objects
- Textured Surfaces: Mimic textures seen on fabrics, wallpapers, or packaging designs.
- Personal Items: Use elements from your home, like buttons or old jewelry pieces.
- Shapes and Patterns: Base your designs on geometric shapes often seen in your surroundings.
Online and Social Media Platforms
- Pinterest Boards: Explore curated bracelet ideas shared by other craft enthusiasts.
- Crafting Blogs: Read detailed tutorials and project ideas for inspiration.
- Social Media Hashtags: Search hashtags like #braceletdesigns or #DIYbracelets for trendy ideas.
Art and Museums
- Art Exhibits: Draw inspiration from artworks and sculptures displayed in museums.
- Historical Designs: Look at ancient jewelry for timeless patterns and styles.
- Color Palettes: Use color combinations seen in paintings or decorative pieces.
Personal Interests
- Hobbies: Create bracelets reflecting sports, music, or favorite TV shows.
- Zodiac Signs: Include charms or colors tied to your astrological sign.
- Memory-Inspired: Base designs on cherished moments, like vacations or special occasions.
Community and Events
- Craft Fairs: Visit fairs to see the latest handmade bracelet designs.
- Workshops: Attend crafting classes for creative ideas and techniques.
- Other Crafts: Observe designs from neighboring crafts like knitting or pottery.
Finding inspiration is about exploring what’s around you and experimenting. Use these ideas to create bracelets that truly stand out.
 Frequently Asked Questions (FAQ)
What types of beads are best for beginners learning how to make bracelets?
How to make bracelets? For beginners, soft glass beads, seed beads, and wooden beads are excellent choices. They are easy to handle and work well with various bracelet making techniques.
How long does it take to make a simple bracelet?
The time it takes to make a simple bracelet varies depending on the design and your skill level. Typically, a basic beaded bracelet can be completed in under an hour, while more intricate designs may take longer.
Can I make bracelets without any special tools?
Yes, you can make simple bracelets without specialized tools. Basic tools like scissors, pliers, and needles are sufficient for many beginner-friendly bracelet projects.
How can I ensure my bracelet stays secure when worn?
Ensure your bracelet stays secure by using sturdy clasps and double-knotting the cords if you’re using elastic. Additionally, regularly check the clasp and any knots for security.
Are there any safety considerations when making bracelets?
Yes, always handle tools like scissors and pliers with care to avoid injury. If using resin or other chemicals, follow the manufacturer’s safety instructions and work in a well-ventilated area.
What are some unique materials I can use to make bracelets?
Unique materials for bracelet making include natural elements like shells and stones, recycled materials, fabric scraps, and even unconventional items like buttons or keys.
How can I sell the bracelets I make?
To sell your bracelets, consider platforms like Etsy, local craft fairs, and social media. You can also create your own website or collaborate with local boutiques to reach a broader audience.
Can I teach someone else how to make bracelets?
Absolutely. Teaching bracelet making can be a rewarding experience. Start by demonstrating basic techniques, providing clear instructions, and encouraging creativity. You can hold workshops, create online tutorials, or guide friends and family members through the process.
 Conclusion
How to make no-sew bead bracelets with elastic? Learning how to make bracelets is a fulfilling and creative endeavor that allows you to craft beautiful and personalized accessories. By understanding the essential tools, exploring various techniques, and practicing consistently, you can master the art of bracelet making and create stunning pieces that reflect your unique style. Whether you’re designing simple beaded bracelets or intricate wire-wrapped pieces, the possibilities are endless.