Introduction
Clay bead bracelets are fun, colorful, and trendy accessories. They are made from small, handmade clay beads strung together to form unique designs. These bracelets can be simple or intricate, depending on the beads and patterns you use. Many people enjoy making them because they offer endless opportunities for creativity.
What Are Clay Bead Bracelets?
Clay bead bracelets are jewelry pieces created using handmade clay beads. These beads are crafted from polymer clay, air-dry clay, or other types of moldable materials. The beads are usually lightweight, vibrant, and customizable. They come in various shapes, sizes, and colors, making them versatile for any style. Some feature sleek, smooth finishes, while others have textured details for added charm.
Popularity and Trends in Jewelry Making
Clay bead bracelets have gained popularity due to their handmade and personalized appeal. They are often seen in DIY crafts, gift items, or fashion accessories. Social media platforms showcase countless designs, inspiring new patterns and trends. Recently, layering multiple clay bead bracelets has become a style statement. This trend allows wearers to mix colors, textures, and sizes, creating eye-catching looks. Jewelry enthusiasts also enjoy customizing them with charms and unique beads for a personal touch.
 Materials Needed
To create beautiful clay bead bracelets, you’ll need the right materials. Proper planning ensures a smooth crafting process. Here’s what you need to get started:
Types of Clay Used for Bead Crafting
Choosing the right clay is crucial for making durable and vibrant beads. Here are common types:
- Polymer Clay: This versatile clay comes in many colors and can be baked for hardening. It’s great for detailed designs and is widely used by crafters.
- Air-Dry Clay: Easy to handle and doesn’t require baking. This clay air-dries naturally but may not be as durable as polymer clay.
- Modeling Clay: Soft and reusable, it’s good for beginners practicing designs, though it’s not permanent.
Each type of clay has its unique features, so pick the one that matches your project goals.
Tools and Supplies Required
Along with clay, you’ll need tools to shape, bake, and string your beads. Here’s a list of essential supplies:
- Cutting Tools: Use small blades or clay cutters to create precise shapes.
- Clay Roller or Rolling Pin: Helps to evenly flatten the clay before shaping.
- Needle or Skewer: These tools make holes in the beads for stringing.
- Baking Sheet or Surface: Necessary for baking polymer clay beads in the oven.
- Paint or Sealant (Optional): Add extra details or protection to your beads.
- String or Elastic Cord: Use this to assemble your bracelet. Choose sturdy and flexible options.
- Clasps or Crimps: For secure, professional-looking closures on your bracelets.
Organizing these materials beforehand will save time and make crafting enjoyable.
Designing Your Bead Bracelets
Designing clay bead bracelets is an enjoyable step. It allows you to express creativity and add personal flair. A thoughtful design begins with choosing vibrant colors, patterns, shapes, and sizes to match your vision.
Choosing Colors and Patterns
Colors and patterns play a key role in the design. Here are tips to make the right choices:
- Color Combinations: Pick colors that complement each other or create striking contrasts. Bright, pastel, and earthy tones work well.
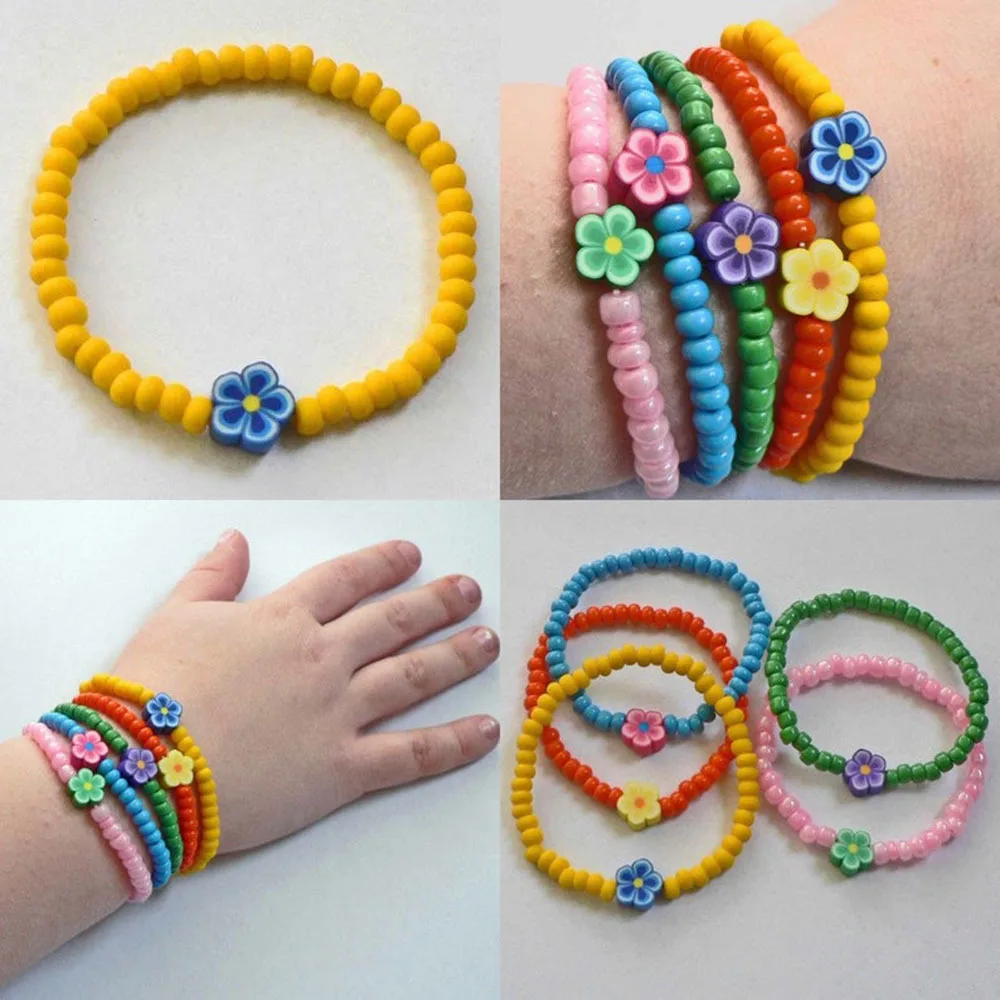
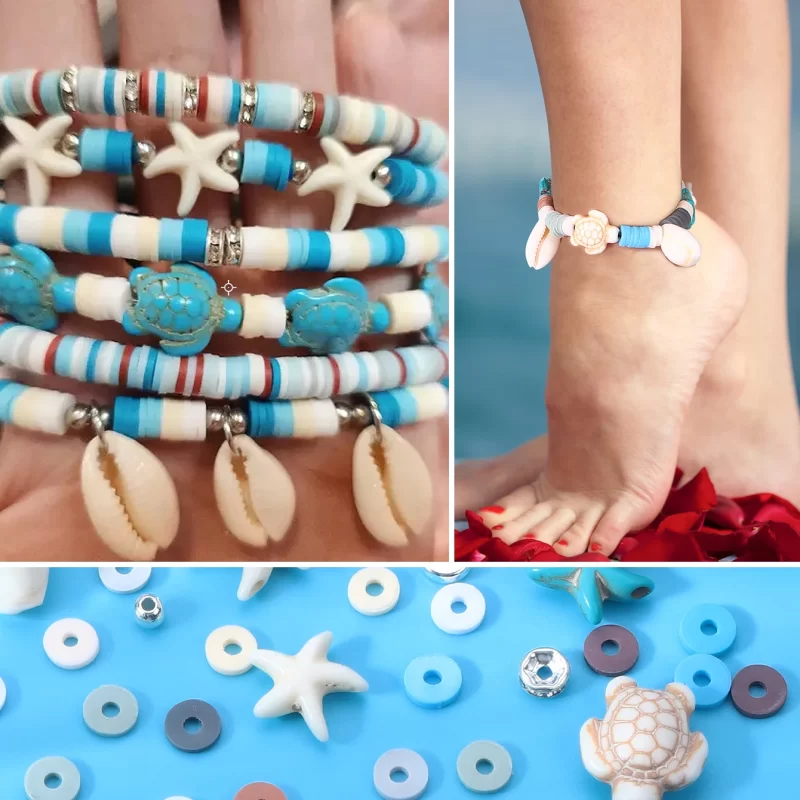
- Themes: Decide on a theme, like ocean-inspired, floral, or bohemian. This guides your color choice.
- Patterns: Try stripes, polka dots, or marbled effects on your beads. These patterns add charm.
- Mood Matching: Use cheerful tones like yellow or orange for fun designs. Opt for neutral hues for elegance.
Experiment with palettes before committing to a design. Lay out your beads to preview the final look.
Exploring Unique Shapes and Sizes
Varying shapes and sizes can elevate your bracelet’s style. Here’s how to explore creative options:
- Classic Rounds: Smooth and round beads offer a traditional and uniform design.
- Geometric Shapes: Use square, triangle, or hexagonal beads for a modern, edgy look.
- Organic Forms: Irregular or textured beads add a natural, handmade aesthetic.
- Bead Sizes: Alternate between small and large beads for depth and variety.
Mixing shapes and sizes along with colors creates an engaging, dynamic bracelet. Balance is key to a cohesive design that stands out.
 Step-by-Step Guide to Making Clay Beads
Creating clay beads is a rewarding craft. Follow these simple steps to make your unique clay bead bracelets.
Preparing the Clay
- Choose Your Clay: Select polymer, air-dry, or modeling clay based on your project needs.
- Condition the Clay: Knead the clay until it’s soft, workable, and free of cracks.
- Roll and Flatten: Use a clay roller or rolling pin to achieve your desired thickness. Aim for an even surface to ensure uniform beads.
- Prepare Work Area: Clean and dry your workspace to avoid dust or debris sticking to the clay.
Shaping and Sculpting Your Beads
- Select Shapes: Decide whether you want round, geometric, or organic forms for your beads.
- Cut and Mold: Use shape cutters or your fingers to mold the clay into beads. Be precise for clean edges.
- Add Texture or Patterns: Use tools or stamps to create lines, dots, or other patterns.
- Make Holes for Stringing: Insert a needle or skewer gently through each bead. Ensure the holes are smooth for easy stringing.
Baking or Air-Drying the Clay
- Polymer Clay: Bake beads as per the clay’s instructions. Usually, bake at 275°F for 15–30 minutes.
- Air-Dry Clay: Leave beads to dry naturally. Ensure they are in a dust-free area.
- Monitor Drying/Baking: Check progress to avoid cracks or discoloration.
- Cool and Harden: Let your clay beads cool completely after baking or drying before handling them.
Following these steps will result in durable, vibrant clay beads ready for making stunning bracelets.
Stringing the Beads Together
Stringing your clay beads is the final step to assembling your bracelet. It requires a balance between functionality and aesthetics. Let’s explore the best ways to string beads securely and stylishly.
Choosing the Right String or Wire
Selecting the appropriate string or wire ensures durability and comfort for your clay bead bracelet. Consider these options:
- Elastic Cord: Perfect for stretch bracelets. It’s flexible, easy to use, and comfortable to wear.
- Nylon Thread: Provides strength and works well for intricate designs and detailed patterns.
- Jewelry Wire: Adds sturdiness. Ideal for bracelets requiring added structural support.
- Silk Cord: Offers a luxurious finish and is often used for delicate or elegant designs.
When choosing, take into account bead size and bracelet purpose. Ensure the string matches bead hole diameter for smooth assembly.
Arranging Beads and Creating a Secure Bracelet
Once your string is ready, follow these steps to assemble your bracelet:
- Lay Out Your Design: Arrange the beads in your desired order before stringing. Test different patterns.
- Start Threading Beads: Place beads onto the string or wire one at a time, keeping the design intact.
- Use Spacers or Accent Beads: Place smaller beads between larger ones for variety and balance.
- Secure the Ends: Tie knots for elastic strings or use crimps or clasps for wires. Tighten securely.
- Test Strength: Pull gently to confirm the bracelet stays intact without splitting or loosening.
- Trim Excess String: Cut any extra string or wire carefully for a neat finish.
By paying attention to arrangement and security, you’ll create a durable and beautiful bracelet. A proper finish ensures your creation will last and look polished.
 Tips for Customizing Your Bracelets
Customizing clay bead bracelets adds personality and uniqueness to your designs. With creativity, you can transform a simple bracelet into a personal masterpiece. Here are some tips to achieve eye-catching customizations.
Adding Charms and Mix-Matching Materials
Charms and mixed materials elevate the beauty of your bracelets. Follow these ideas:
- Incorporate Metal Charms: Add small metal charms for a shiny and elegant accent.
- Attach Pendants: Use meaningful pendants, like initials, symbols, or gemstones, for added detail.
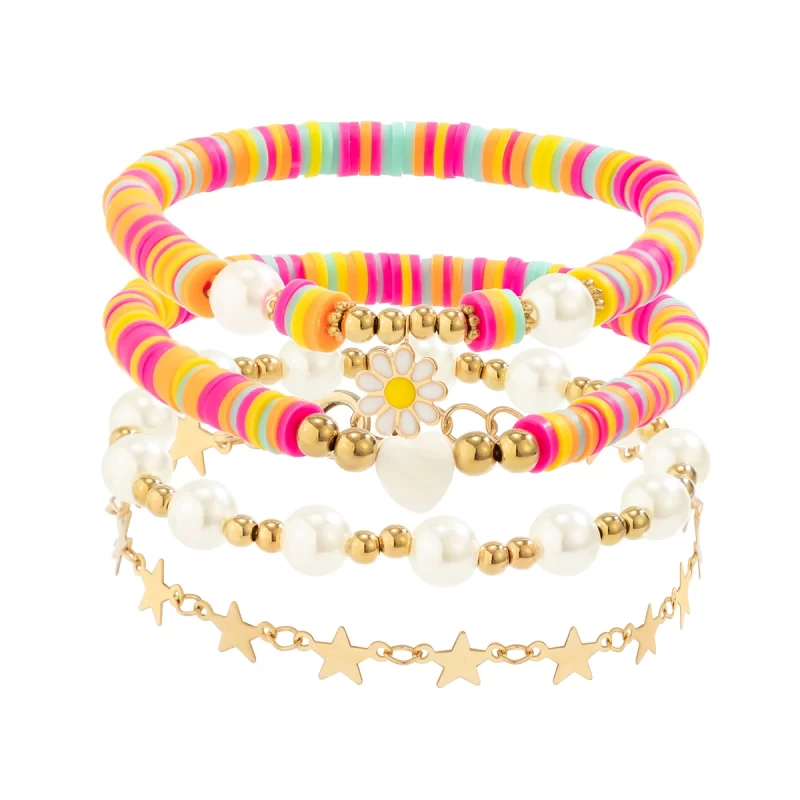
- Mix Materials: Combine beads with pearls, wood, or crystals for an eclectic look.
- Layer Textures: Alternate between smooth and textured beads for visual interest.
- Use Spacer Beads: Include tiny spacer beads for neat and polished designs.
Mixing materials and adding charms will bring depth and personality to your clay bead bracelet.
Personalizing for Gifts or Special Occasions
A customized bracelet makes a thoughtful gift or commemorates a special moment. Use these ideas:
- Add Names or Words: Include letter beads to spell out names or meaningful words.
- Incorporate Birthstones: Use beads in the recipient’s birthstone color for a personal touch.
- Select Themed Patterns: Create designs based on events, like weddings or birthdays.
- Coordinate Colors: Match bracelet colors to the occasion, e.g., red for love or gold for celebration.
- Pack Creatively: Present the bracelet in a decorative box or pouch with a written note.
Personalizing your clay bead bracelet makes it memorable and cherished by the recipient.
Caring for Your Clay Bead Bracelets
Proper care ensures your clay bead bracelets remain beautiful and durable for a long time. Learning how to clean and repair them is essential. Here are practical tips to maintain their charm and quality.
Cleaning and Maintaining Longevity
Keeping your clay bead bracelets clean enhances their appearance and prolongs their life. Follow these steps:
- Use a Soft Cloth: Wipe off dirt or dust with a dry, soft cloth.
- Avoid Harsh Chemicals: Stay away from soap, bleach, or cleaners that could harm the beads.
- Spot Clean as Needed: For small stains, use a damp cloth or cotton swab gently.
- Protect from Water: Keep your bracelets away from water to prevent damage to the clay.
- Store Properly: Place in a cloth or zip-lock pouch to avoid scratches or dirt.
- Limit Sun Exposure: Prolonged sunlight can fade the beads’ color over time.
Regular cleaning coupled with proper storage will keep your bracelets looking vibrant.
Repairing and Storing Properly
Sometimes, bracelets may break or lose their original charm. Here’s how to fix and store them:
- Re-Thread Broken Bracelets: Replace broken strings and reassemble beads in their original order.
- Reattach Charms: Use jewelry pliers to securely attach loose charms or pendants.
- Seal Cracks: Apply a thin layer of clear glue to repair minor bead cracks.
- Organize Properly: Separate bracelets to prevent tangling or scratching.
- Use Divided Boxes: Store each bracelet in its own compartment inside a jewelry organizer.
- Handle Gently: Avoid tugging or force that could damage beads or strings.
By cleaning, repairing, and storing your bracelets carefully, they will stay as stylish as when you first made them.
 Exploring Advanced Techniques
Enhancing clay bead bracelets with advanced techniques can elevate their design and appeal. These methods include using specialty beads and layering bracelets to create standout styles.
Incorporating Specialty Beads
Specialty beads add unique textures, colors, and details to your bracelets. Here are some ideas:
- Glass Beads: Use glass beads for a glossy and elegant look.
- Wooden Beads: Add rustic charm by pairing clay beads with natural wooden options.
- Gemstone Beads: Incorporate semi-precious stones for sophistication and color variety.
- Metal Accents: Include metal beads or charms for a polished, modern vibe.
- Decorative Shapes: Select specialty beads in themed shapes like stars or flowers.
Integrating these beads helps personalize your bracelet while diversifying its visual appeal. Mix and match materials creatively for standout designs.
Layering Bracelets for a Stylish Look
Layering bracelets is a trendy way to make your accessories stand out. Follow these tips:
- Color Coordination: Combine bracelets with complementary or contrasting colors for balance.
- Vary Sizes: Pair chunky bracelets with slimmer ones to create dynamic visual interest.
- Mix Textures: Combine smooth clay beads with textured or specialty beads.
- Play with Themes: Layer bracelets based on themes, such as floral or geometric designs.
- Add Variety: Incorporate bracelets with unique charms or pendants for extra detail.
Layered bracelets work well for casual and formal occasions, letting you express your style boldly.

The Art of Clay Bead Bracelets: DIY Design Inspiration & Trendy Color Combinations
Creating clay bead bracelets is an art form that blends creativity, texture, and color. Whether you’re crafting for fun or making statement accessories, these patterns for clay bead bracelets and good color combinations will inspire your next project:
1. Patterns for Clay Bead Bracelets: Modern & Timeless Designs
Start by experimenting with clay bead patterns that reflect your style:
- Geometric Statement Patterns: Arrange square, triangle, or cylindrical beads in staggered sequences. Add metallic spacers (like brass or silver) to create architectural clay bead bracelets with a bold, modern edge.
- Gradient Waves: Gradually shift colors from light to dark shades of blue, pink, or green to mimic natural elements like ocean waves or sunsets. Translucent polymer clay enhances this effect, letting light pass through for a luminous finish.
- Layered Texture Play: Mix smooth, polished beads with raw, textured ones. Pair earthy tones like terracotta and sage green for a bohemian vibe, or combine matte and glossy finishes for tactile contrast.
2. Good Color Combinations for Clay Bead Bracelets: Tips for Stunning Results
Choosing the right color combinations elevates your design from basic to breathtaking:
- Neutral Harmony: Layer cream, beige, and taupe beads with gold-toned accents for a minimalist, luxury look. This palette pairs well with casual or formal outfits.
- Vibrant Contrast: Mix electric blue with burnt orange or magenta with forest green for eye-catching clay bead bracelets that demand attention. These color schemes for bracelets work best in short, bold sequences.
- Nature-Inspired Palettes: Channel autumn with moss green, rust, and ochre, or embrace summer with turquoise and coral. Stick to 2–3 main colors and use metallic beads as connectors for cohesion.
3. Pro Tips for Perfecting Your Clay Bead Masterpiece
- Test Colors First: Create a mood board with clay swatches before baking to ensure your color combinations for clay bead bracelets work together.
- Balance Texture & Scale: Alternate large and small beads to add visual interest. For example, pair chunky geometric beads with tiny seed beads for depth.
- Embrace Personalization: Engrave initials, add tiny charms, or carve symbols into beads to make your clay bead bracelets uniquely yours.
Whether you’re crafting for yourself or gifting, clay bead bracelets offer endless possibilities to express your creativity. From modern patterns to vintage-inspired palettes, these designs ensure your jewelry stands out as both art and wearable accessory.
Conclusion
In conclusion, clay bead bracelets offer a unique blend of artistic beauty, versatility, and personal expression that makes them a standout accessory in any jewelry collection. Their handcrafted nature ensures that each bracelet is a one-of-a-kind piece, reflecting the creativity and skill of the artisan. Whether you’re seeking a stylish addition to your everyday wardrobe, a meaningful gift for a loved one, or a statement piece for special occasions, clay bead bracelets provide endless possibilities to elevate your look.
By understanding the benefits, exploring the various styles, and following best practices for care and maintenance, you can fully appreciate and enjoy the elegance and craftsmanship of clay bead bracelets. Embrace the opportunity to express your individuality and enhance your personal style with these beautiful and versatile accessories. Let clay bead bracelets become a cherished part of your fashion journey, adding color, texture, and artistic flair to every outfit.